With over 70% of organizations actively piloting automation technologies, it’s clear that businesses across industries are looking for ways to streamline repetitive tasks. Python has emerged as a powerful tool for Word document automation, helping businesses enhance efficiency and simplify common document processing tasks.
In this article, we explore 8 ways to supercharge your Python MS Word automation projects. We'll cover techniques to generate reports, customize document layouts, and streamline the manipulation and optimization of Word documents. These tips will help you utilize Python’s features to improve document handling and increase productivity. Let’s get started.
How to choose a Python library for Microsoft Word automation
Let’s start by looking at the Python libraries that you can work with to automate Word processing. There are two main options, each with their own pros and cons:
python-docx
Python-docx is a basic Python library that excels at reading and creating Word docs. While it can be used to update Word docs, it lacks some more advanced functionality. It’s a good, easy-to-use option with all the basic features to automate document generation.
| Pros | Cons |
|---|---|
|
|
Use cases:
- Creating Word documents using Python code
- Formatting documents, including styling text, titles, headers, footers
- Inserting images and shapes into existing documents
- Creating lists and tables
docxtpl
Instead of being managed with just Python code, the docxtpl package works by creating a Word document template - a version of the document that you want to create. Essentially, it’s a higher-level library built on top of python-docx, and it relies on it to handle low-level manipulation of Word documents.
Docxtpl provides more advanced functionality by combining both python-docx for reading, writing, and creating documents along with jinja2 for managing tags inserted into the template document. A lot of customizing happens directly in a template, and in return a document can be generated with a few lines of code.
| Pros | Cons |
|---|---|
|
|
Use cases:
- Dynamically generating custom documents
- Using tags to create if conditionals and for loops
- For loop for generating horizontal and vertical tables
- Using media placeholders to replace (i.e. with a picture)
8 ways to supercharge Microsoft Word automation with Python
Now, let’s take a closer look at the kinds of automation that can be done using these Python libraries. From very basic document generation to more complex table manipulation, we’ll walk through 8 examples of how to use Python to automate Microsoft Word:
Generate Word documents
The most foundational automation task is generating a new document. You can use the Python libraries we looked at earlier in the article to create word documents or leverage an existing Word document as a template to generate new documents from. Let's look at pros and cons of each method:
Method 1: Generating Word documents from scratch with Python
If you want complete control over every aspect of the document and prefer to work in Python (as opposed to abstracting things with a template), then you definitely have that option. Using a library like python-docx can allow you to do just that.
But, the downside is that it can be time-consuming and does require detailed knowledge of different methods and properties in Python libraries, which may not be approachable for some business users.
Method 2: Generating Word documents from templates
The other approach is to create Word documents from templates using a library like docxtpl. It requires less Python expertise after you create the initial template and you can more easily achieve more consistency across documents, but the main drawback is that you simply have less control. Template constraints may limit design flexibility and you can run into issues where any mistake in the template is then replicated across all generated documents.
Modify Word documents
Using techniques similar to those for generating Word documents from scratch, you can also open and modify existing Word documents. This capability is invaluable for automating updates to documents that adhere to a predefined structure.
With Python libraries, you can adjust everything from paragraphs and headings to tables and images, inserting dynamic content sourced from data. This functionality allows for a range of applications, from updating a figure in a monthly report to generating coherent text from complex datasets.
To effectively utilize these tools, it's beneficial to understand how Microsoft Word documents are structured and managed. Some of the key features of the python-docx library include:
- The document object is the highest-level file object. Document attributes include the file name and other file-level properties.
- The middle ‘paragraph’ level includes document class objects like paragraphs, tables, pictures, headings, page breaks, and sections. Using ‘paragraph’ as an example, attributes include line spacing, space before/after, etc.
- The lowest level is the ‘text’ level. This includes attributes like fonts, color, typeface, text size.
Embed images, data, and documents
Using Python, it's possible to enhance Word documents by embedding images, data, and even other documents. Central to this process is the Document object, a high-level construct that encapsulates all properties of a Word document. This object acts as the foundation for all other components within the document, such as paragraphs, tables, and images. Embedding content into a Word document varies in complexity:
Inserting a picture with python-docx is nothing more than a line of code:
document.add_picture('monty-truth.png', width=Inches(1.25))For more complex formatting operations you can utilize the docxtpl replace function, which allows you to replace placeholder objects in a word document with your own. This can be done either with images or objects like files. Let’s look at a few examples:
Example 1: Embed an image
template.relpace_pic('dummy_pic.jpg', ‘pic_i_want.jpg')Example 2: Replace the original file (docx, excel, powerpoint, pdf, etc.)
Files
template.replace_embedded('embedded_dummy.docx','embedded_docx_i_want.docx')
template.replace_zipname(
    'word/embeddings/Microsoft_Office_Excel1.xlsx',
    'my_excel_file.xlsx')
This will replace the original file with the provided file. replace_embedded() works only for docx files while replace_zipname() works for other types like excel, powerpoint or pdf files. These methods will embed files not raw data.
Templating
Docxtpl leverages the Jinja templating engine, which supports special placeholders within the document template. These placeholders allow the use of code snippets similar to Python syntax, enabling dynamic data insertion to render the final document. Once a template is set up, generating personalized documents is a straightforward task.
When using docxtpl, it is important to note that you can utilize all Jinja2 tags, although there are certain limitations. Jinja2 tags should only be used within the same 'run' of a paragraph. In Microsoft Word, a 'run' is defined as a sequence of characters that share the same style.
A few important things to know before generating personalizing documents with templating:
| Default jinja tags: | Tags provided by docxtpl for jina: |
|---|---|
|
|
Example 1: Use templates and if statements to write unique copy
{# This is a comment that won't appear in the final output #}
{% if age > 18 %}
  Congratulations, {{ name }}! You're an adult now.
{% else %}
  Hey there, {{ name }}! You're still under 18.
{% endif %}
Your current age is: {{ age }}
Docxtpl can utilize jinja templating to create more complex renders using special tags, for example tables.
Example 2: Use templates to create a table
from docxtpl import DocxTemplate

# our template file containing the table
template = DocxTemplate("employees_template.docx")

# define employees list
employees = [
  {'name': 'John Doe', 'age': 30, 'position': 'Manager'},
  {'name': 'Jane Smith', 'age': 25, 'position': 'Developer'},
  {'name': 'Emily Brown', 'age': 28, 'position': 'Designer'}
]

# create a context dictionary
context = {
  "employees": employees,
}

# render the template with the context data
template.render(context)

# save the generated document
template.save("Employees.docx")
employees_template.docx file:
| Name | Age | Position |
|---|---|---|
{%tr for employee in employees %} | ||
{{ employee.name }} | {{ employee.age }} | {{ employee.position }} |
{%tr enfor %} | ||
Note that the statement is used with the {%tr … %} tag, which signals that we want to insert a table row. For columns it would be {%tc … %}.
The above code should yield a table like this:
| Name | Age | Position |
|---|---|---|
| John Doe | 30 | Manager |
| Jane Smith | 25 | Developer |
| Emily Brown | 28 | Designer |
Format paragraphs
Paragraph formatting is a crucial aspect of manipulating Word documents programmatically. There’s a wide range of formatting that can be done with Python, including:
- Modifying the font, color, and size of text
- Alignment of the text within a paragraph
- Indentation rules
- Spacing before or after paragraphs
- Line spacing of a paragraph or entire document
- Controlling page breaks
Let’s look at a couple examples of how we could implement some of these changes using Python:
Example 1: Align paragraph left/right/center
This will set the alignment of the paragraph text to left, center, right, or justify:
from docx import Document
from docx.enum.text import WD_PARAGRAPH_ALIGNMENT

doc = Document()
paragraph = doc.add_paragraph("This is a centered paragraph.")
paragraph.alignment = WD_PARAGRAPH_ALIGNMENT.CENTER
doc.save("aligned_paragraph.docx")
Example 2: Set line spacing rule for a paragraph
We can specify the line spacing for a particular paragraph:
from docx import Document
from docx.enum.text import WD_LINE_SPACING

doc = Document()
paragraph = doc.add_paragraph("This is a paragraph with custom line spacing.")
paragraph_format = paragraph.paragraph_format
paragraph_format.line_spacing_rule = WD_LINE_SPACING.DOUBLE
doc.save("line_spacing_rule_paragraph.docx")
Embed charts
Embedding charts into Word documents is a vital functionality for many automation applications, though the complexity can vary depending on the specific requirements. For those looking to add a chart as an image, the process is relatively straightforward.
However, If you need to embed an actual chart object, the process requires a deeper understanding of Python programming and the behavior of Word file structures. This method caters to more complex needs and allows for greater interaction with the embedded charts.
Let’s begin with the straightforward image embedding method:
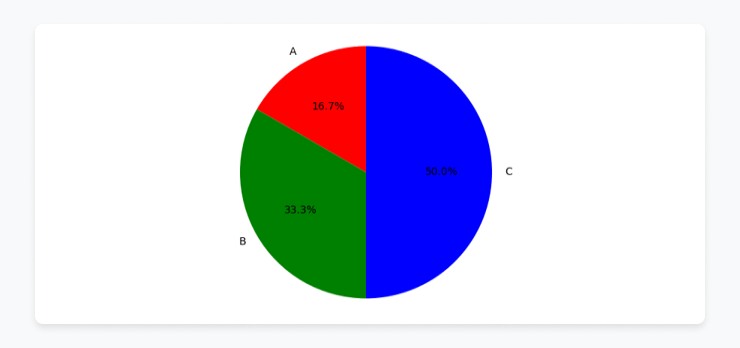
Method 1: Embed an image of a chart
This method only works if you’re ok with embedding an *image *of a chart rather than the chart *object *itself.
We need to start by creating an excel workbook and populating it with data. Generally the flow looks like this:
- Data Preparation: Define the data for the chart, including labels and values.
- Excel Workbook Creation: Use matplotlib to generate a chart.
- Word Document Setup: Create a new Word document using python-docx and add a title.
- Chart Embedding: Insert the image of a chart into the Word document using doc.add_picture().
- Save and Cleanup: Save the Word document.
import matplotlib.pyplot as plt
from docx import Document
import docx.shared

# Define the values for the PieChart
labels = ["A", "B", "C"]
sizes = [10, 20, 30]
colors = ['red', 'green', 'blue']  # Optional: Add colors

# Create a pie chart using matplotlib
fig, ax = plt.subplots()
ax.pie(sizes, labels=labels, colors=colors, autopct='%1.1f%%', startangle=90)
plt.axis('equal')  # Equal aspect ratio ensures that pie is drawn as a circle.

# Save the pie chart as an image
image_path = 'chart_image.png'
plt.savefig(image_path)
plt.close()

# Create a new Word document
doc = Document()

# Insert the image of the chart into the Word document
doc.add_picture(image_path, width=docx.shared.Inches(5), height=docx.shared.Inches(4))

# Save the Word document
docx_path = "embedded_chart.docx"
doc.save(docx_path)
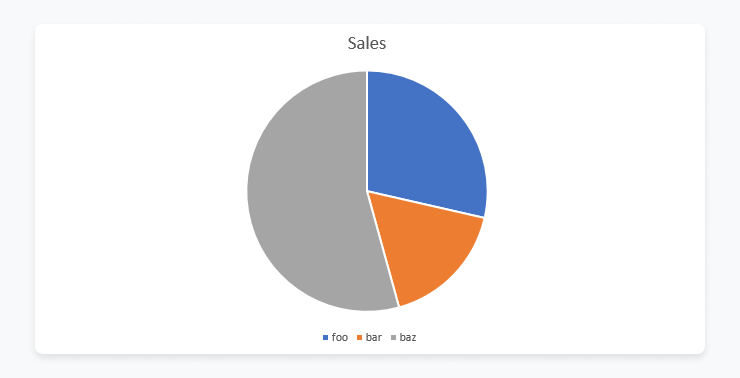
Method 2: Embed an interactive chart object
If you need to embed interactive chart objects instead of just images into your word documents, things get more complicated. In fact, this method is more like a creative workaround than a straightforward solution.
Instead of relying on python-docx alone, we leverage the structure of DocX files:
- Unzip DocX: DocX files are essentially zip archives. By unzipping them, we gain access to their contents.
- Understand the Structure: DocX files consist of XML files. We can manipulate these XML files to modify the document's contents.
- Excel Integration: When adding charts in a DocX file, it embeds an Excel file with the chart data.
To implement this workaround, we’ll follow this flow:
- Prepare a Word Template: Create a Word document with the desired chart(s) already inserted.
- Manipulate the Template:
- Unzip the template into a temporary folder.
- Locate and modify the embedded Excel file with the chart data using openpyxl.
- Locate and modify the chart XML file using BeautifulSoup.
- Rezip the Template: After making the necessary modifications, zip the files back into a DocX document.
- Cleanup: Delete the temporary folder.
Here's a simplified code snippet to illustrate the process:
import os
import shutil
import zipfile
from bs4 import BeautifulSoup
from openpyxl.reader.excel import load_workbook

# The values to put in the PieChart
list_of_labels = ["foo", "bar", "baz"]
list_of_values = [70, 42, 133]

template_path = "template.docx"
tmp_dir = "/tmp/workdir"

# Unzip the docx
os.makedirs(tmp_dir, exist_ok=True)
with zipfile.ZipFile(template_path, "r") as zip_ref:
    zip_ref.extractall(tmp_dir)

# Load and fix the docx xlsx
xlsx_path = os.path.join(
    tmp_dir, "word", "embeddings", "Microsoft_Excel_Worksheet.xlsx"
)
workbook = load_workbook(xlsx_path)
sheet = workbook.active
for i, label in enumerate(list_of_labels):
    sheet[f"A{i+2}"] = label
for i, value in enumerate(list_of_values):
    sheet[f"B{i+2}"] = value
workbook.save(xlsx_path)
workbook.close()

# Load and fix the docx xml
chart_xml_path = os.path.join(tmp_dir, "word", "charts", "chart1.xml")
with open(chart_xml_path) as xml_file:
    contents = xml_file.read()

soup = BeautifulSoup(contents, "xml")
plot_area = soup.find("c:plotArea")

# Fix categories/labels of the pie chart
cat = plot_area.find("c:ser").find("c:cat")
cache = cat.find("c:strCache")

cache.clear()
ptCount = soup.new_tag("c:ptCount", val=str(len(list_of_labels)))
cache.append(ptCount)
for i, key in enumerate(list_of_labels):
    pt = soup.new_tag("c:pt", idx=str(i))
    v = soup.new_tag("c:v")
    v.string = key
    pt.append(v)
    cache.append(pt)

# Fix values of the chart
val = plot_area.find("c:ser").find("c:val")
cache = val.find("c:numCache")

cache.clear()
ptCount = soup.new_tag("c:ptCount", val=str(len(list_of_values)))
cache.append(ptCount)
for i, key in enumerate(list_of_values):
    pt = soup.new_tag("c:pt", idx=str(i))
    v = soup.new_tag("c:v")
    v.string = str(key)
    pt.append(v)
    cache.append(pt)

with open(chart_xml_path, "w") as xml_file:
    xml_file.write(str(soup))

# Recompress and remove tmp folder
destination_file = "my_finished_report.docx"

with zipfile.ZipFile(destination_file, "w") as new_zip:
    for foldername, subfolders, filenames in os.walk(tmp_dir):
        for filename in filenames:
            file_path = os.path.join(foldername, filename)
            arcname = os.path.relpath(file_path, tmp_dir)
            new_zip.write(file_path, arcname)

shutil.rmtree(tmp_dir)
Extract information
Another key strategy for Python Word automation lies in extracting valuable information from documents. This is especially useful when dealing with large amounts of documents or text-heavy files. Using Python libraries, such as python-docx, you can easily navigate through paragraphs, tables, and other content to extract and further process the required information. Moreover, python-docx can be used to iterate over tables and rows, extracting cell data, and even images or other media embedded in the document.
Here's an example of extracting text from a Word document:
from docx import Document

def read_text(filename):
    doc = Document(filename)
    full_text = []
    for paragraph in doc.paragraphs:
        full_text.append(paragraph.text)
    return '\n'.join(full_text)

print(read_text('test.docx'))
This code opens the specified Word document and reads all paragraphs, appending the text to the full_text list. The '\n'.join(full_text) at the end ensures that the paragraphs are separated by a new line when printed or returned.
PRO TIP: Extracting text is often the first step in document processing. Once extracted, you can do many document processing tasks like:
- Generate concise summaries of long documents or create executive summaries for business reports.
- Analyze trends and patterns with Pandas by creating data frames from extracted text, or enrich datasets by merging text data with other data sources.
- Use matplotlib to visualize sentiment analysis results through graphs and charts.
- Train classification or regression models to perform tasks such as spam detection or predicting customer satisfaction from textual data.
- Implement search functionality within large document sets or enhance retrieval systems with NLP for more accurate and relevant search results.
Convert Word documents
The last automation task we’ll look at is converting word documents into various popular document formats. Let’s walk through some of the most common
Example 1: Convert Word documents to PDF documents
PDFs and Word documents are both popular document formats, but PDFs specifically are widely used for sharing documents securely and consistently across different devices. Using Python, you can easily convert Word documents into a PDF output file using the docx2pdf package.
from docx2pdf import convert

# Convert a single Word document to PDF
convert("example.docx")

# Convert all Word documents in a directory to PDF
convert("my_docs_folder/")
Example 2: Convert Word documents to HTML
For web-based applications or creating online documentation, you might need to convert Word documents into HTML format. The mammoth Python library offers a straightforward way to accomplish this.
import mammoth

with open("example.docx", "rb") as docx_file:
    result = mammoth.convert_to_html(docx_file)
    html = result.value

with open("example.html", "w") as html_file:
    html_file.write(html)
Example 3: Convert Word documents to plain text
Plain text is useful for processing documents or extracting raw information. The python-docx library allows you to extract text from Word documents easily.
import docx

doc = docx.Document("example.docx")
full_text = [paragraph.text for paragraph in doc.paragraphs]
text = "\n".join(full_text)

with open("example.txt", "w") as text_file:
text_file.write(text)Word document automation with SoftKraft
If you’re looking for a development team to bring your document processing vision to life, we’d love to help. We offer Python outsourcing services that simplify the implementation process, enabling you to achieve business results without the hassle. Our team will guide you in selecting the right Python library, planning development, and building an end-to-end solution that perfectly aligns with your business requirements.

Conclusion
Python stands out as a versatile solution for streamlining document automation. With its array of functionalities, businesses can efficiently generate reports, customize layouts, and optimize Word documents with ease. By leveraging Python's capabilities, organizations can enhance productivity and efficiency, empowering them to focus more on core objectives and less on repetitive tasks.


